How to run a Medal of Honor: Allied Assault (MOHAA) dedicated server on an AWS EC2 Windows instance


Medal of Honor: Allied Assault is the best World War 2 first person shooter ever made (I won't hear another word about it). And many years ago I occasionally played free-for-all deathmatch over LAN with my family, we had a blast, it's such an easy game to pick up and play. We recently spoke about playing a game of MOHAA deathmatch again but given the geographical limitations we'd need to play over the internet instead.
After doing some AWS training I wondered, can you run a dedicated MOHAA server on a free tier EC2 Windows instance?
It turns out, you can. Well, I've only tested it with 4 concurrent players but I'm pretty confident it could handle more. Below are the steps to run a MOHAA dedicated server on an EC2 Windows instance:
1. Buy a copy of MOHAA
Just to save me some time and effort I ended up buying the Medal of Honor: Allied Assault War Chest from GOG, it's DRM free and no CD key is required for installation. I like GOG.
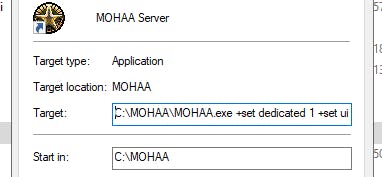
2. Install MOHAA and create a custom shortcut
Install MOHAA War Chest on your local machine and navigate to the root of the installation directory. Create a new shortcut of the MOHAA.exe (I called mine MOHAA Server) and update it's properties, adding the following parameters to the Target attribute:
+set dedicated 1 +set ui_console 1 +exec server.cfg
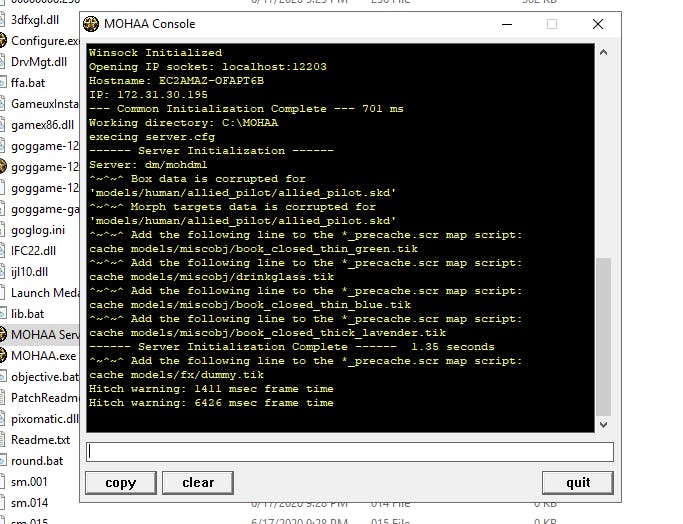
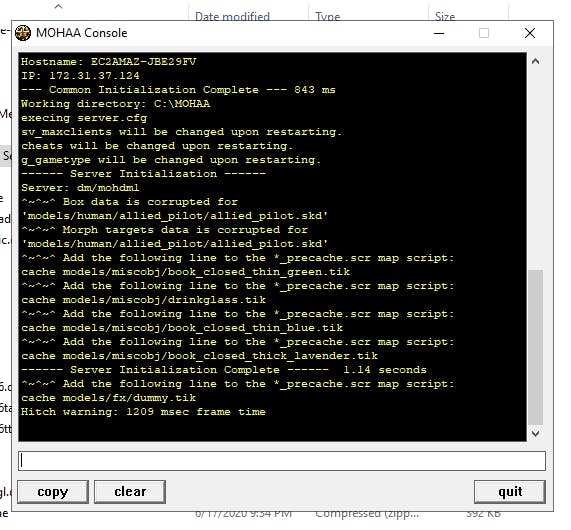
If you run your new MOHAA Server shortcut the MOHAA console should launch but you'll get an error due to the missing server.cfg:

3. Configure the MOHAA dedicated server
The server.cfg configuration file will contain everything needed to customise a game server.
Create the server.cfg configuration file in the /main folder of your installation directory and the MOHAA.exe will look there by default. Below is a boilerplate config:
FYI, individual configurations can be excluded by adding the // prefix. Also, the configuration file can be renamed to whatever you like, just don't forget to update the shortcut (+exec parameter) accordingly.
//************** Server Info **************
seta sv_hostname "MOHAA Server"
//seta g_motd "Message here"
//sets "+Admin" "Place admin name here"
//sets "+Clan" "Set clan here"
//sets "+Teamspeak3" "10.10.10.10:9999"
//sets "+Location" "UK"
//sets "+Hosted By" "EC2"
//sets "+Website" "www.mohaa.co.uk"
//sets "+Email" "mohaa@mohaa.co.uk"

//************ General Settings **************
seta skill 0 //added
seta sv_timeout "200"
seta sv_precache "1"
seta sv_maxRate "25000"
seta sv_privateClients ""
seta sv_maxclients "4"
seta sv_reconnectlimit "10"
seta sv_zombietime "1"
seta g_inactivity "0"
seta g_forcerespawn "0"
seta g_syncronousclients "0"
seta g_smoothClients "1"
seta sv_fps 20
seta sv_allowdownload 0
seta sv_floodprotect "1"
seta cheats "0"
seta sv_pure "0"

//*********** Server Network Settings ********
seta sv_flood_waitdelay "10"
seta sv_flood_persecond "4"
seta sv_flood_msgs "4"
seta noipx "1"

//************** Logs ************************
//seta fs_basepath .
//seta fs_userpath /log
//seta fs_outputpath /log
//seta logfilename "qconsole.log" //deactivated
//seta writeconfig "config.log" //deactivated
seta logfile 3
seta g_logSync "1"
seta sv_chatter 1

//seta developer 0 //1,2,3 modes available
//seta sv_debuggamespy 0 //information gamespy

//*************** Extras ********************
seta sv_maxPing "0" //activated
seta sv_minPing "0" //activated

//************* Server Passwords ************
seta rconpassword "password"
//seta sv_privatePassword ""
//seta password "x" // deactivated

//******** Game Play Default Settings *******
seta g_gravity "800"
seta g_knockback "1000"
seta g_quadfactor "3"
seta g_speed "320"
seta g_healrate 0
seta g_healthdrop 1
seta g_realismmode 1
seta g_forceteamspectate 1
seta g_spectate_allow_full_chat 0
seta sv_team_spawn_interval 0
seta g_inactivespectate 0
seta g_inactivekick 0
seta g_teamswitchdelay 10
seta g_allowjointime 20 //default 30
seta cg_forcemodels 1

//*************** Team Preferences **********
seta g_teamdamage "0"

//**************** Voting *******************
//seta g_allowVote "0" //deactivated
//seta g_votetimeout "0.3"

//************* Masterservers ***************
// add up to 4 additional master servers
//seta sv_master1 "mohmaster.2015.com"
//seta sv_master2 "master0.gamespy.com"
//seta sv_master3 "master1.gamespy.com"
seta sv_gamespy 0

//******************Gametype ****************
// Set the type of game: 1=Deathmatch 2=Team match 3=Roundbased 4=Obj
seta g_gametype 1

seta roundlimit "5"
seta timelimit "10"
seta fraglimit "0"
seta dmrespawning "0"
seta dmroundlimit "0"

//************* Map Rotation / First Map ************
sv_maplist "dm/mohdm1 dm/mohdm2 dm/mohdm3 dm/mohdm4 dm/mohdm5 dm/mohdm6 dm/mohdm7"
// sv_maplist "obj/obj_team1 obj/obj_team2 obj/obj_team3 obj/obj_team4"
map "dm/mohdm1"
Run the MOHAA Server shortcut and the console should load with no errors.
4. Creating an EC2 Windows Instance
Now that the MOHAA Server has been configured locally the next step it to create the EC2 instance. For the purposes of this How To I will assume you already have an AWS account and a very basic knowledge of AWS. If you need any more information, Amazon provide a rich set of documentation or feel free to ask me a question below and I will do my best to help!
Login to your AWS account and head over to the EC2 section.
FYI, select the AWS Region geographically closest to whoever will be playing, this will ensure you have the lowest possible latency between the game clients and server.
On the EC2 console select Launch instance. This will load the EC2 instance wizard.
Step 1: Amazon Machine Image (AMI), select the Microsoft Windows Server Base.
Step 2: Instance Type, select t2.mirco (free tier) - but if you want to run a large sever then you'll probably need a t2.small or t2.medium. It might take a bit of trial and error to figure out the right size.
Click next for steps 3, 4 and 5, as the default options are fine.
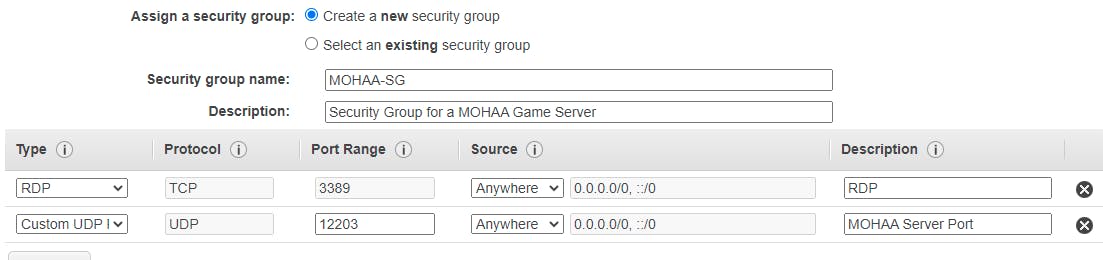
Step 6: Configure Security Group, create a new group called MOHAA-SG and provide a meaningful description. RDP will be added by default but update the Source to Anywhere (if you want to explicitly provide your own IP then feel free). Then add a new rule, creating a new Custom UDP Rule for port 12203 (MOHAA Server default port) and select the Source as Anywhere (this will allow game clients from any IP to connect).
Step 7: Review Instance Launch, confirm instance details are correct and click Launch. You'll be prompted with a dialog box to select an existing key pair or create a new one, this is necessary to establish an RDP connection to the server. If you don't have an existing one then select Create a new key pair and provide the name MohaaWindowsServerKey, then Download Key Pair. Once downloaded, Launch Instances!
The Instances area of the EC2 Dashboard should load, your new instance will take a few minutes to initialise, wait for this to complete. In the meantime, name your instance (something nice and original, like MOHAA Server...).

5. RDP connection to the EC2 Instance
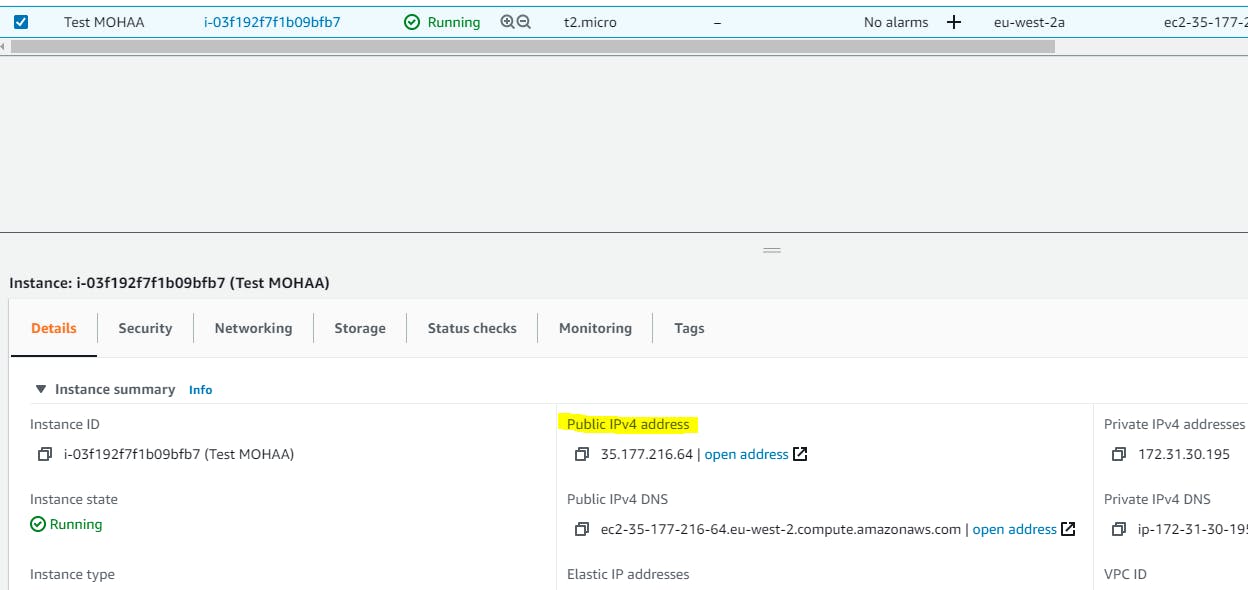
Once the EC2 instances is running you can attempt to connect. First let's gather the credentials from AWS, do this by navigating to the Instances area of the EC2 Dashboard and selecting your MOHAA Server instance. Inside the details panel copy the Public IPv4 address and paste it into Notepad.
FYI, the IPv4 will only be populated if the instance is running and they are assigned dynamically by default. This means each time you stop and start your instance, a different IPv4 will be assigned.
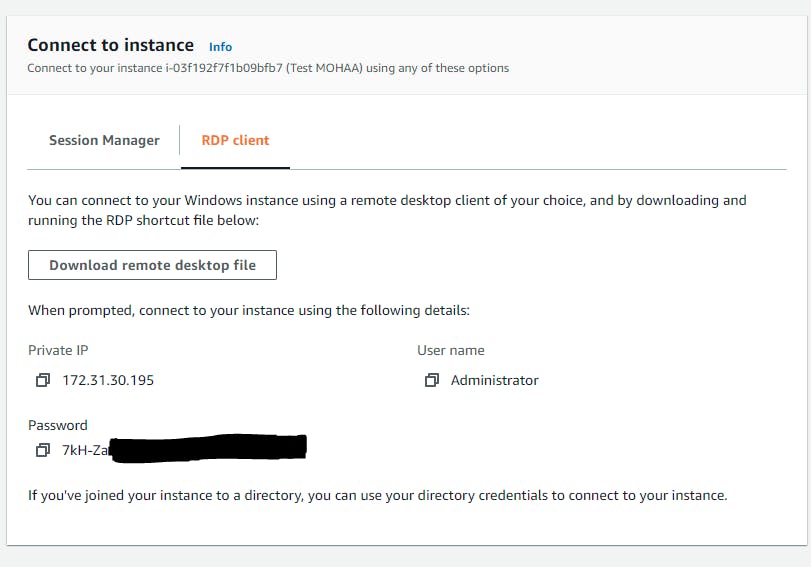
The next step is to get the password. Still in the Instances area of the EC2 Dashboard, right click the instance and select Connect. The Connect to instance page will load, select RDP client and then Get password. Browse your computer to find the MohaaWindowsServerKey key pair (created in Section 4, Step 7 above), then select Decrypt Password. A password should now appear in the Connect to instance page, copy this, along with the User name and paste them into Notepad with your IPv4.
Now having the public IPv4, user name and password for your EC2 instance an RDP connection can be attempted. Open Remote Desktop Connection and select Show Options in the bottom left corner. Under General, paste in the public IPv4 into the Computer field and the User name into the corresponding field. Finally, under Local Resources make sure Clipboard is selected in Local devices and resources.
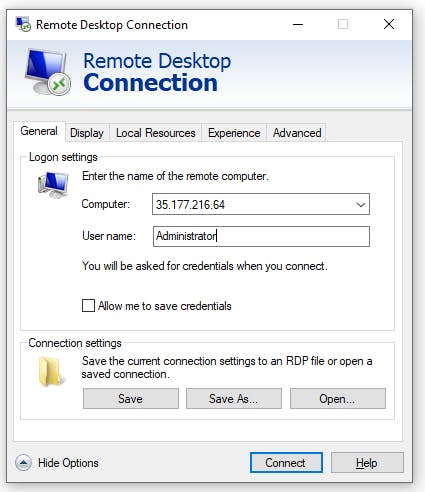
Click Connect, you should be prompted for a password. Paste in what was generated from your key pair and click OK. You may then be prompted with a security certificate warning, select Yes. You should now be connected!
FYI, I had problems establishing an RDP connection and after 3 hours of furious googling, it turned out it was my anti-virus. Bitdefender switches out the security certificate for one it creates causing the connection to be refused. This was resolved by adding both c:\windows\system32\mstsc.exe and c:\windows\syswow64\mstsc.exe to the Bitdefender Exclusions list.
6. Copying the MOHAA game files to the EC2 Instance
On the EC2 instance open File Explorer and create a new folder called MOHAA in the root of C:\ - navigate into this folder.
Switch back to your local computer, open File Explorer and navigate to your MOHAA installation directory, then select all of the game files and copy them to your clipboard. Make sure the shortcut (created in section 2) and the server.cfg (created in section 3) are also selected.
If you've installed Medal of Honor: Allied Assault War Chest then you don't need to copy everything, see below the necessary files (doing this will reduce the time needed to copy the files over to AWS):
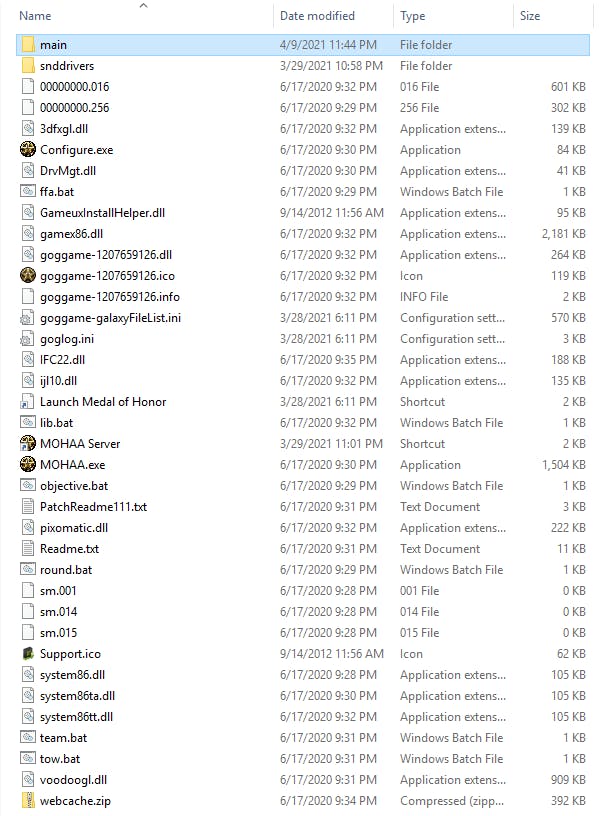
There is probably additional unrequired files but I know the selection above works.
Switch back to the Remote Desktop Connection and paste the game files inside the C:\MOHAA folder. This should take about 15 minutes to upload (depending on your connection speed).

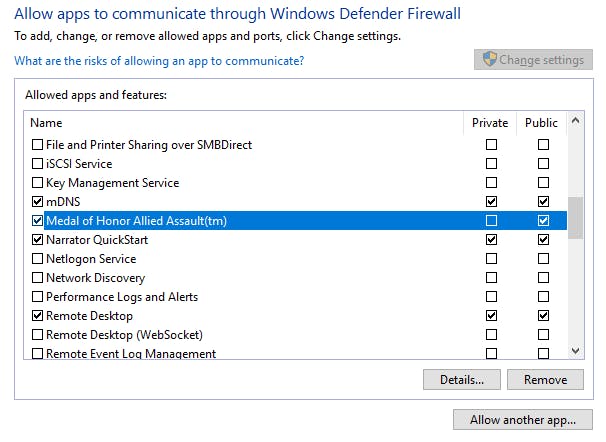
7. Adding the MOHAA.exe to Windows Defender Firewall
By default Windows will block inbound and outbound traffic to the MOHAA.exe. To allow traffic open Windows Defender Firewall on the EC2 instance, click Allow an app or feature through Windows Defender Firewall. Then click Allow another app..., navigate to C:\MOHAA\MOHAA.exe and select Open, then Add.
Public should be selected, as shown below:
8. Running the MOHAA.exe
Once the game files have finished copying, confirm the server.cfg is located inside the C:\MOHAA\main folder. It might be worth opening the config in Notepad to double check it's correct.
Run the MOHAA Server shortcut and the MOHAA console will load.
9. Connect to the MOHAA game server
Make a note of the public IP address of your EC2 instance (the same IP address you used to establish the RDP connection) and launch the Medal of Honor game on your local computer.
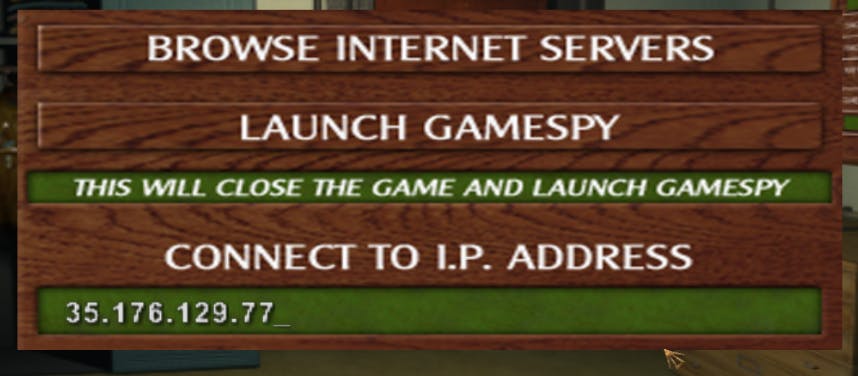
Once in the game's main menu go to Multiplayer, then Join Game and Join Internet Game. Enter the public IPv4 of your EC2 instance and click Connect To I.P. Address.
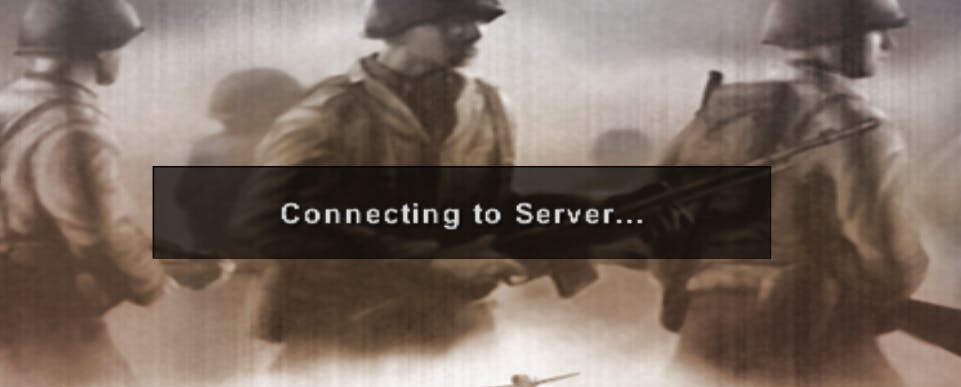
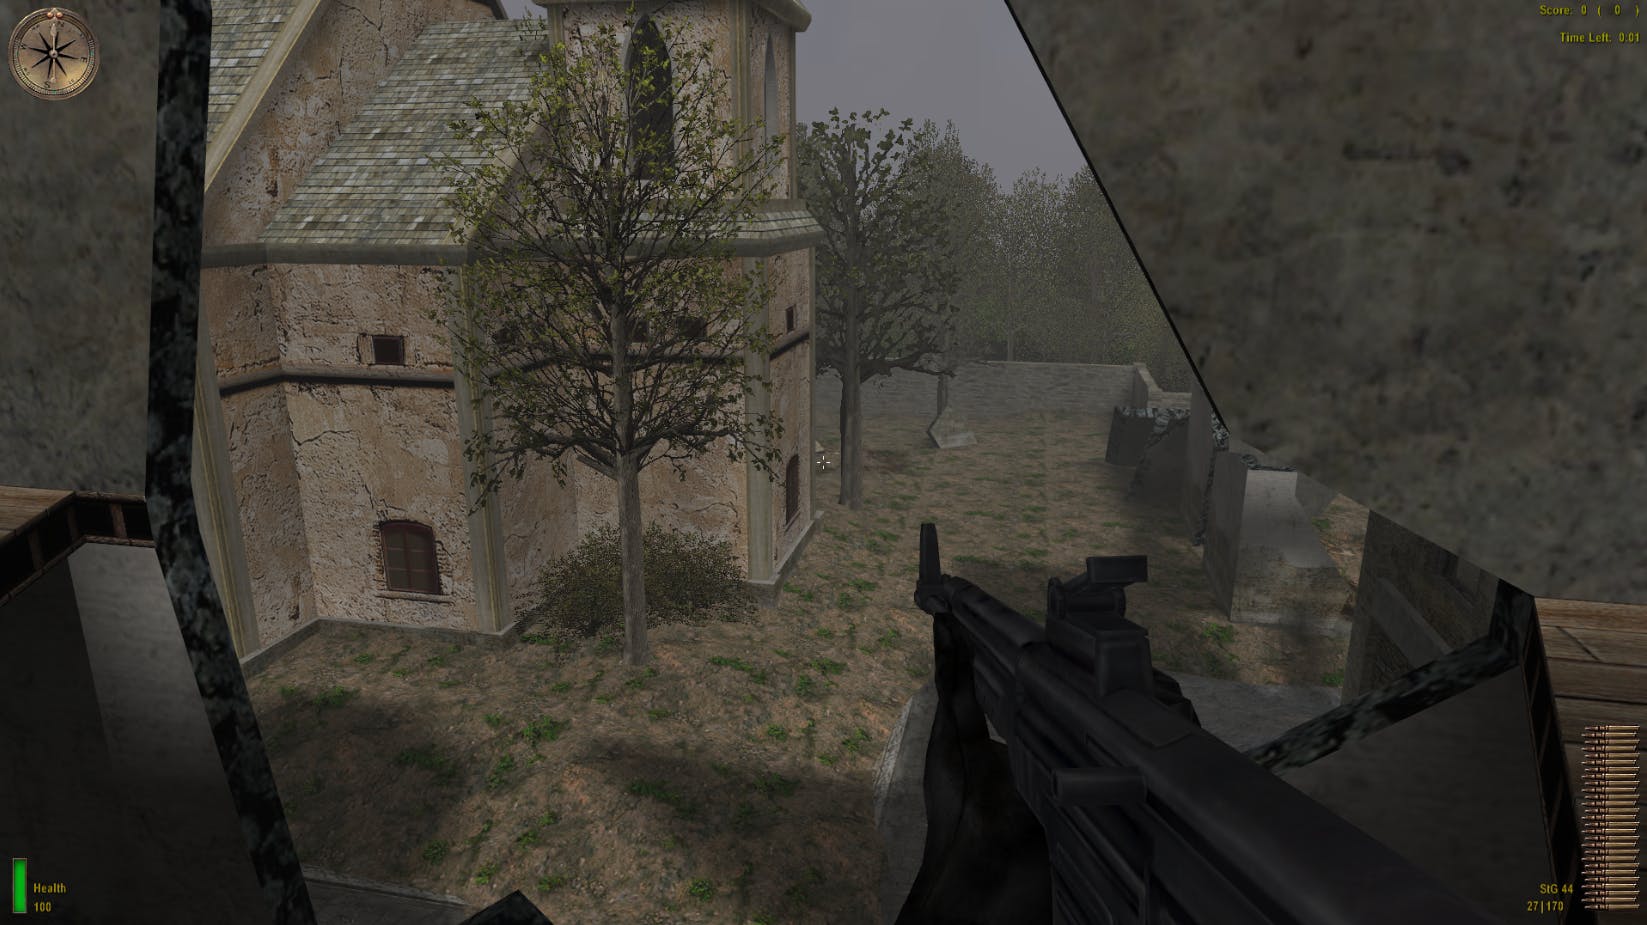
You should connect and start to load the map.
Hopefully everything worked and you are now playing on your very own private MOHAA server! Just give the public IPv4 of your EC2 instance to friends and family so the fun can start!
FYI, if you're having connection issues it's likely to be the EC2 Security Group or Windows Defender Firewall. Double check these are configured correctly, you can always disable the Firewall completely and allow all UDP traffic in the Security Group to help troubleshoot (not recommended as a long term solutions due to the security risks).
10. A few helpful bits
To enable a 1920x1080 resolution in game, open the unnamedsoldier.cfg (located in main\configs of the MOHAA installation folder) and under the Cvars section add the following properties:
seta r_customwidth "1920"
seta r_customheight "1080"
seta r_mode "-1"
RCON commands I use most (you'll need to have console enabled in game, this can be done in Options, then Advanced and select Console):
rconpassword passwordhere      //Enables rcon commands to run in game. The password is defined in server.cfg
rcon restart      //Reloads the current map
rcon map dm/mohdm4      //Changes map to one specified
More RCON commands can be found here.
Thanks for reading, and I hope someone finds this useful!